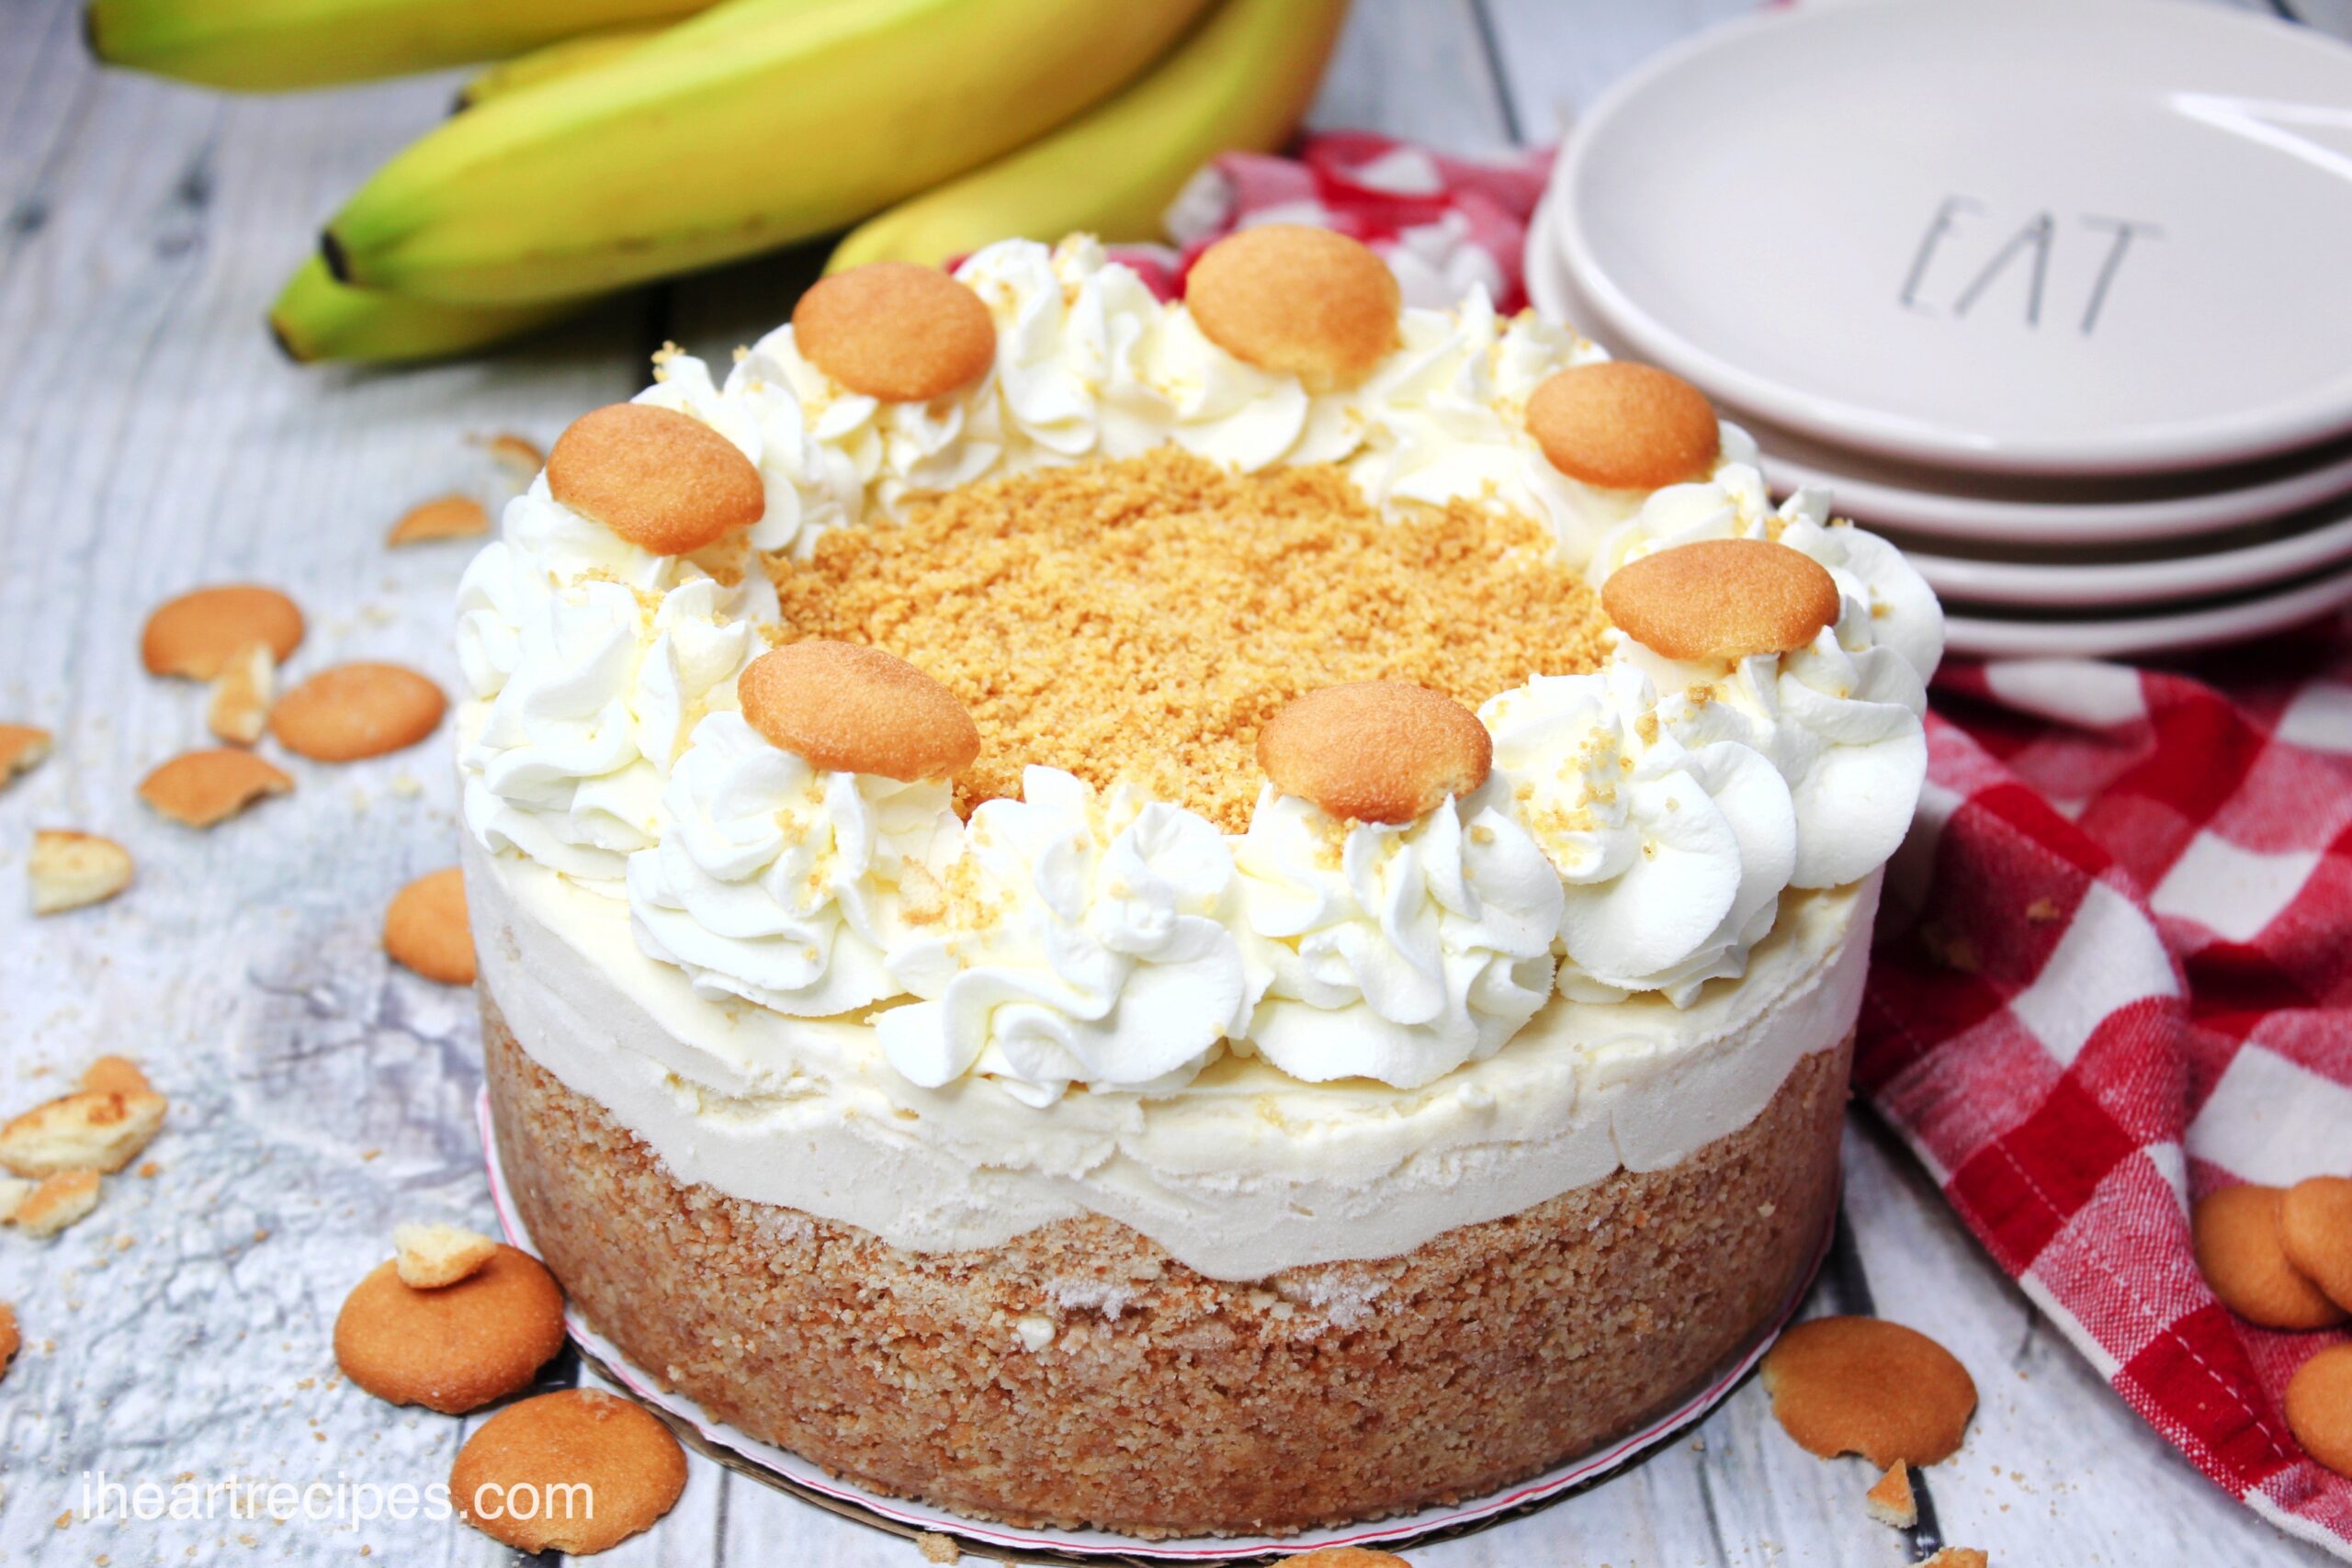
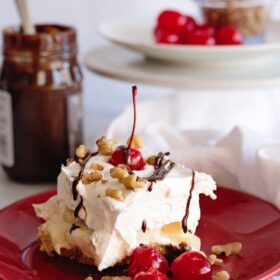
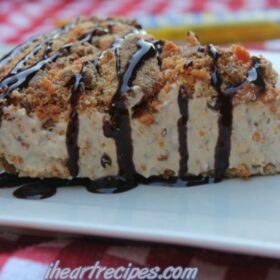
This cheesecake is irresistible! It combines two classics into one banana pudding cheesecake – a delicious no-bake dessert!

If you’re looking for a delicious way to indulge without having to bake, look no further! This is a heavenly combination of two classic desserts that will make your taste buds come alive.
What Is No-Bake Banana Pudding Cheesecake?
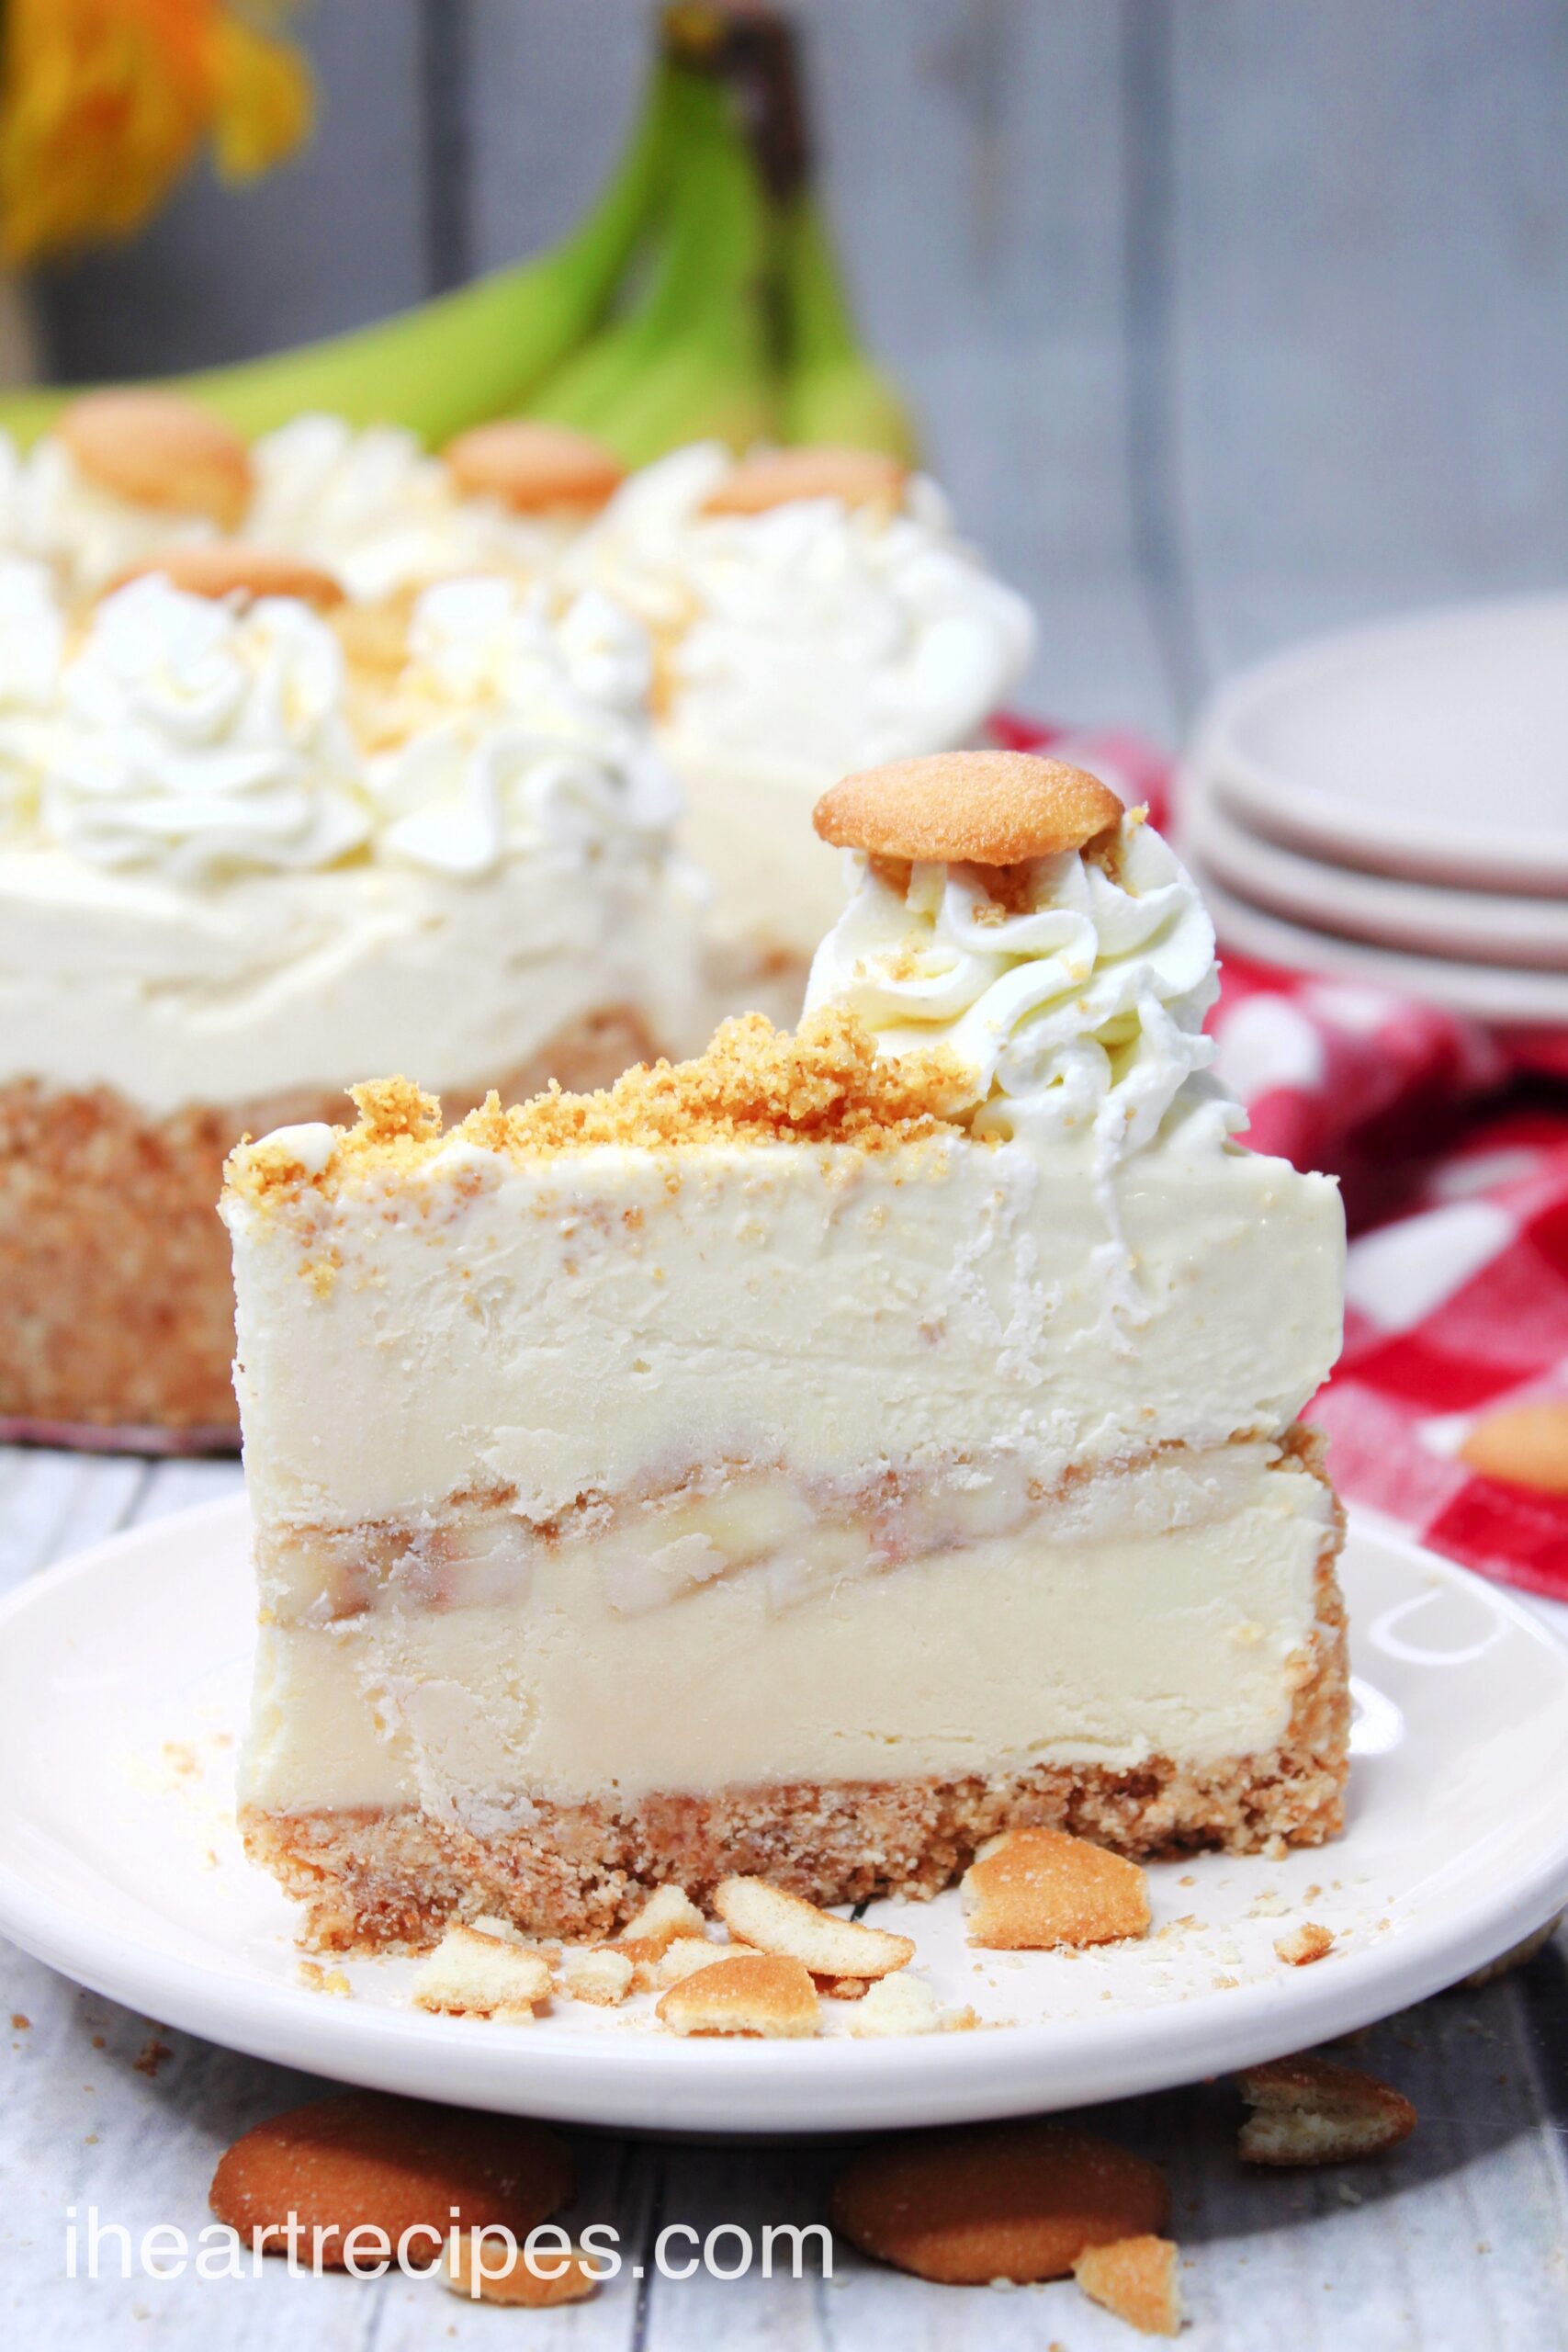
Banana pudding cheesecake is a creamy dessert that combines the flavors of banana pudding and cheesecake. It has a smooth cheesecake texture but tastes like a banana cream pie. The crust is made from vanilla wafers, providing a sweet crunchy finish.
It’s an indulgent weeknight treat and it’s perfect for potlucks and parties.
Ingredients and Shopping List
- Sweetened condensed milk—for a sweet taste and creamy texture.
- Egg yolks—the yolks of two large eggs.
- Cornstarch—to thicken up the mixture.
- Standard Nilla wafers—one 11-ounce box for a yummy crust.
- Mini Nilla wafers—one small package to top.
- Unsalted sweet cream butter—this binds the wafers for the crust.
- Kosher salt—to balance the sweetness.
- Water—tap or bottled.
- Vanilla extract—a baking essential.
- Powdered gelatin—for a thick texture without baking.
- Medium lemon—the juice of one medium-sized lemon.
- Cold heavy cream—3 cups total, some to top some to mix in.
- Cream cheese—softened on the counter.
- Mascarpone cheese—softened on the counter.
- Bananas—3 large and ripe bananas.
- Powdered sugar—just 2 tablespoons for this recipe.
Supplies Needed:
- Food processor
- Mixing spoons
- Measuring spoons
- Measuring cups
- Fine mesh strainer
- Medium heatproof bowl, preferably metal
- Small mixing bowl
- Small microwave-safe bowl
- Small saucepan
- Whisk
- Heatproof flexible spatula
- Plastic wrap
- 9-inch spring form pan
- Optional: egg separator

How to Make a Delicious Banana Pudding Cheesecake: Pro-Tips & FAQs
How Do You Make Banana Pudding Cheesecake Without Baking?
The challenge with making a traditional cheesecake is that if it’s overbaked even a tiny bit, it won’t taste as good. Not to worry, as this cheesecake’s ingredients are mixed on the stove, in a bowl, and in the microwave.
While it will need at least 4 hours to set, you won’t have to turn your oven on.
What if I Forgot to Soften the Cream Cheese and Mascarpone Cheese?
To ensure your banana pudding cheesecake is creamy and smooth, you need to soften both the cream cheese and the mascarpone cheese.
Mascarpone—the mascarpone will soften on the countertop in about 15 minutes. So, if you forgot to soften it, just take it out of the refrigerator before you gather all of your ingredients.
Cream cheese—the cream cheese takes closer to 60 minutes on the countertop to soften, faster if it’s hot or humid. If you need to soften it faster, follow the tips below:
- A faster way to soften cream cheese on the countertop: remove your cream cheese from the box and foil and place it on a cutting board. Cut it into 1-inch cubes and separate the cubes so that air flows through. It will soften in 20 to 30 minutes.
- Softening cream cheese in a water bath: remove your cream cheese from the box but keep the foil on. Place it in a bowl of warm, not hot, water. Let it sit for about 30 minutes.
- Softening cream cheese with a mixer: remove your cream cheese from the box and foil and place it in a mixing bowl. Mix on medium for 2 minutes and let it sit for 10 minutes. If it’s not soft after 10 minutes, mix it for another 2 minutes and let it sit for 5 minutes.
- Softening cream cheese in the microwave: microwave heat speeds vary greatly, so keep a close eye. If your cream cheese melts, you won’t be able to use it. Remove your cream cheese from the box and foil and place it on a microwave-safe plate. Microwave on low for 10 seconds. Flip it over and microwave it for 10 more seconds. If it’s still not soft, flip it over once more and microwave it for 5 to 10 more seconds.
How to Crush the Nilla Wafers Without a Food Processor?
Not to worry if you don’t have a food processor yet, use one of these methods below:
- Blender—place about one-third of the wafers in a blender and blend on high. Add more as the wafers begin to crumb.
- Freezer bag—add the wafers to the largest zip-top baggie you have. Crush them with a rolling pin or the back of a measuring cup. Crush in small batches if you only have sandwich or liter-sized baggies.
How Ripe Should the Bananas Be?
While some desserts call for very ripe bananas (like this Banana Bread recipe) ensure your bananas are perfectly yellow and ripe for this no-bake banana pudding cheesecake. If they are too green the bananas will be too firm. If they are overripe, they will brown faster.
How Do You Keep Bananas From Turning Brown?
Although brown bananas are unsightly, they still taste good and are safe to eat within 3 days of preparing this recipe. The contact with the air (oxidation) is what turns them brown. To keep your bananas from turning brown:
- Wait to slice until you are ready to add them to your recipe.
- Ensure the bananas in the middle are completely coated in the cheesecake filling. This will minimize oxidation so that they brown slower.
- Prep the day you plan to serve for maximum visual appeal.
- Wait to slice the bananas for the top until just before serving.
How Many Days in Advance Can I Prepare a Banana Pudding Cheesecake?
This recipe will taste amazing for 3 days. To keep it fresh, store it in a sealed cake stand. As mentioned above, the bananas will begin to brown after they are sliced. So, for maximum visual appeal, prepare the day you plan to serve.
More No-Bake Dessert Recipes to Try
If you are still perfecting your baking skills, or are looking for more no-bake recipes, these options are as stunning as they are delicious!
- No-Bake Pina Colada Cheesecake
- No-Bake Lemon Cheesecake
- No-Bake Butterfinger Pie
- No-Bake Strawberry Cheesecake Lasagna

No-Bake Banana Pudding Cheesecake
Ingredients
- 14 oz can sweetened condensed milk
- 2 large egg using yolks
- 1 tablespoon cornstarch
- 11 oz box Nilla wafers
- 1 small package of mini Nilla wafers
- ½ cup unsalted sweet cream butter
- 1 teaspoon kosher salt divided
- 1 tablespoon water
- 1 tablespoon vanilla extract
- 2 teaspoons unflavored powdered gelatin
- ½ medium lemon
- 3 cups cold heavy cream divided
- 8 oz cream cheese softened
- 8 oz mascarpone cheese softened
- 3 large ripe bananas divided
- 2 tablespoons powdered sugar
Instructions
- Fit a fine-mesh strainer over a medium heatproof bowl (preferably metal).
- Pour 14 oz of sweetened condensed milk, 2 large egg yolks, and 1 tablespoon of cornstarch in a small saucepan and whisk to combine.
- Bring the mixture to a boil over medium-high heat while whisking constantly, and occasionally scraping down the sides of the saucepan with a spatula.
- Continue boiling and whisking until thickened to the texture of pudding.
- Scrape the mixture into the strainer and press through the strainer with the flexible spatula.
- Press a sheet of plastic wrap directly onto the surface of the pudding. Refrigerate until completely cooled, about 2 hours.
- Place the Nilla wafers in a food processor fitted with the blade attachment.
- Process until finely ground, about 20 seconds.
- Transfer 1/2 cup to a small bowl and reserve for sprinkling.
- Add the butter and 1/2 teaspoon of kosher salt to the remaining crumbs in the food processor.
- Transfer the mixture to a 9-inch springform cake pan.
- Press the crumbs evenly into the bottom, and about 1 inch up the sides. Refrigerate or freeze for at least 30 minutes to firm up.
- Place 1 tablespoon water, and 1 tablespoon vanilla extract in a small microwave-safe bowl and sprinkle 2 teaspoons powdered gelatin over the top.
- Set aside for at least 5 minutes to fully bloom.
- Juice 1 tbsp of lemon juice from the lemon, then set to the side.
- Transfer the cooled pudding to the food processor or blender.
- Add 2 cups of the cold heavy cream, 8 ounces cream cheese, 8 ounces mascarpone cheese, and the remaining 1/2 teaspoon kosher salt.
- Process until smooth, about 1 minute.
- Microwave the gelatin mixture until the gelatin is melted and the mixture is the consistency of warm corn syrup, about 15 seconds.
- Turn the food processor on and pour the gelatin mixture through the feed tube while it’s still warm.
- Continue blending until smooth and creamy, 1 to 2 minutes.
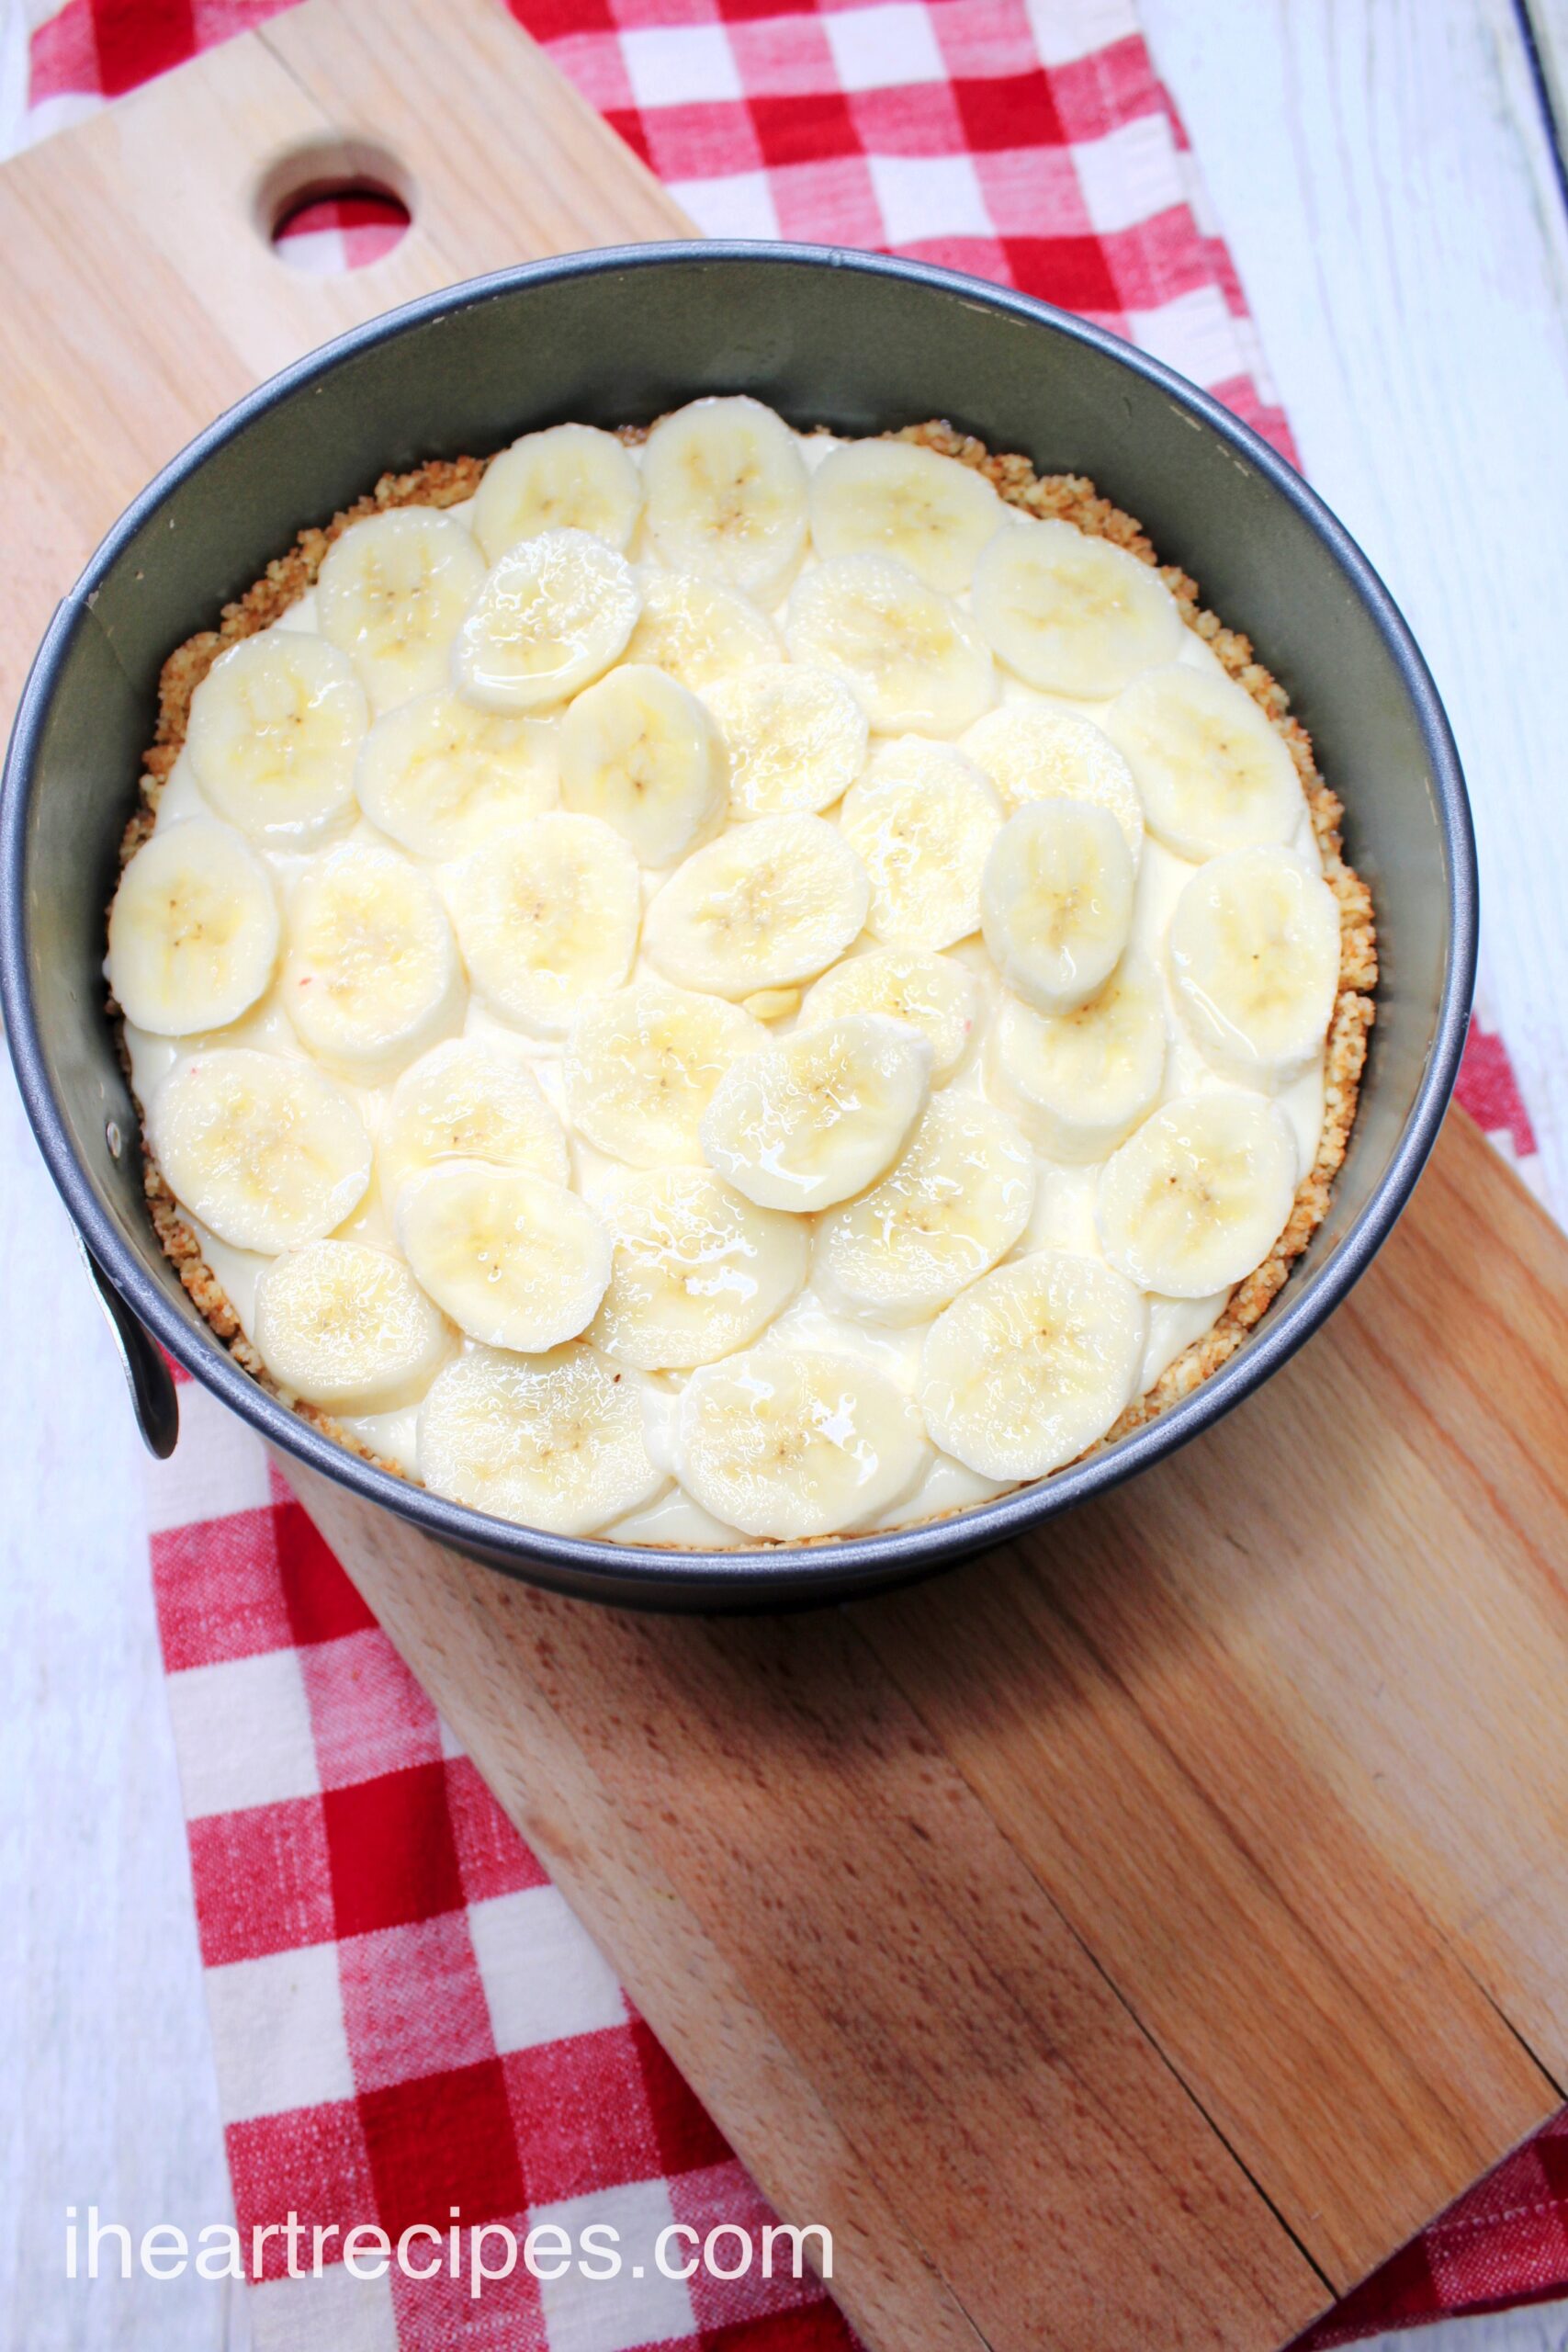
- Transfer half of the batter into the crust and spread it into an even layer with an offset spatula. Peel and thinly slice 2 1/2 large ripe bananas in ¼ inch pieces.
- Arrange the slices evenly on top of the filling in a circular pattern.
- Brush the lemon juice onto the bananas.
- Sprinkle the reserved 1/4 cup cookie crumbs evenly over the bananas.
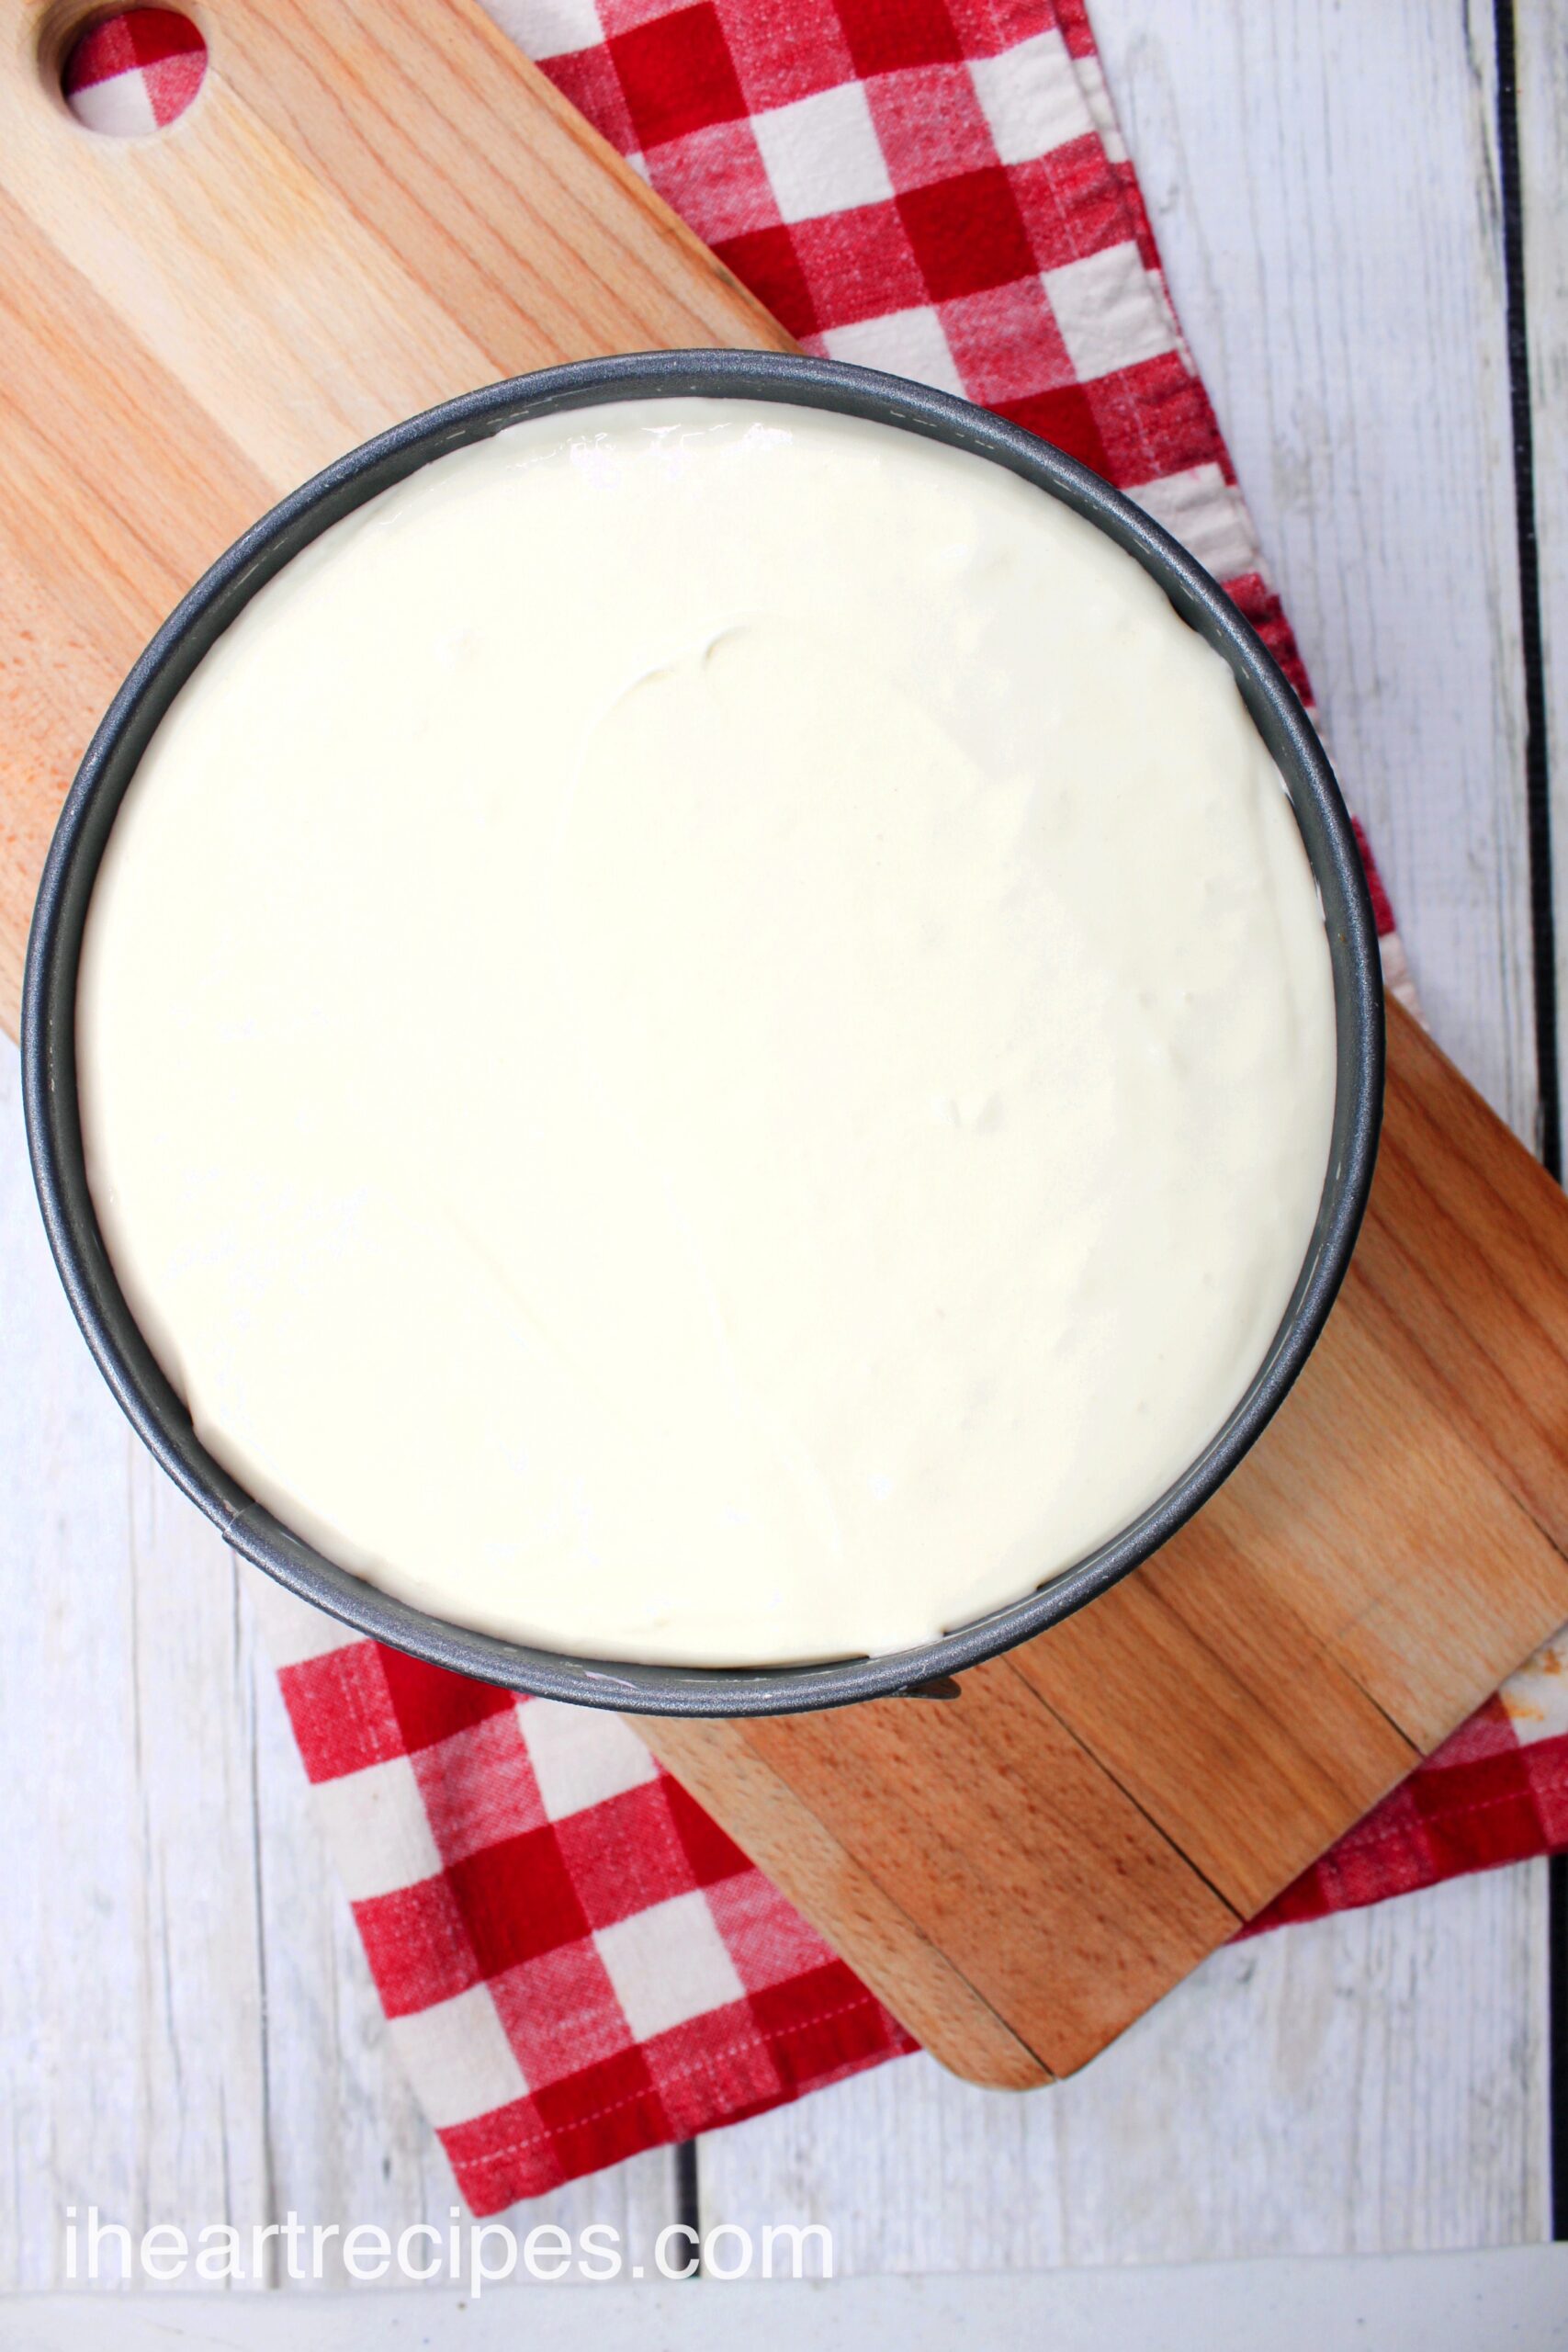
- Top with the remaining batter and spread into an even layer.
- Cover with plastic wrap and refrigerate until set, about 24 hours
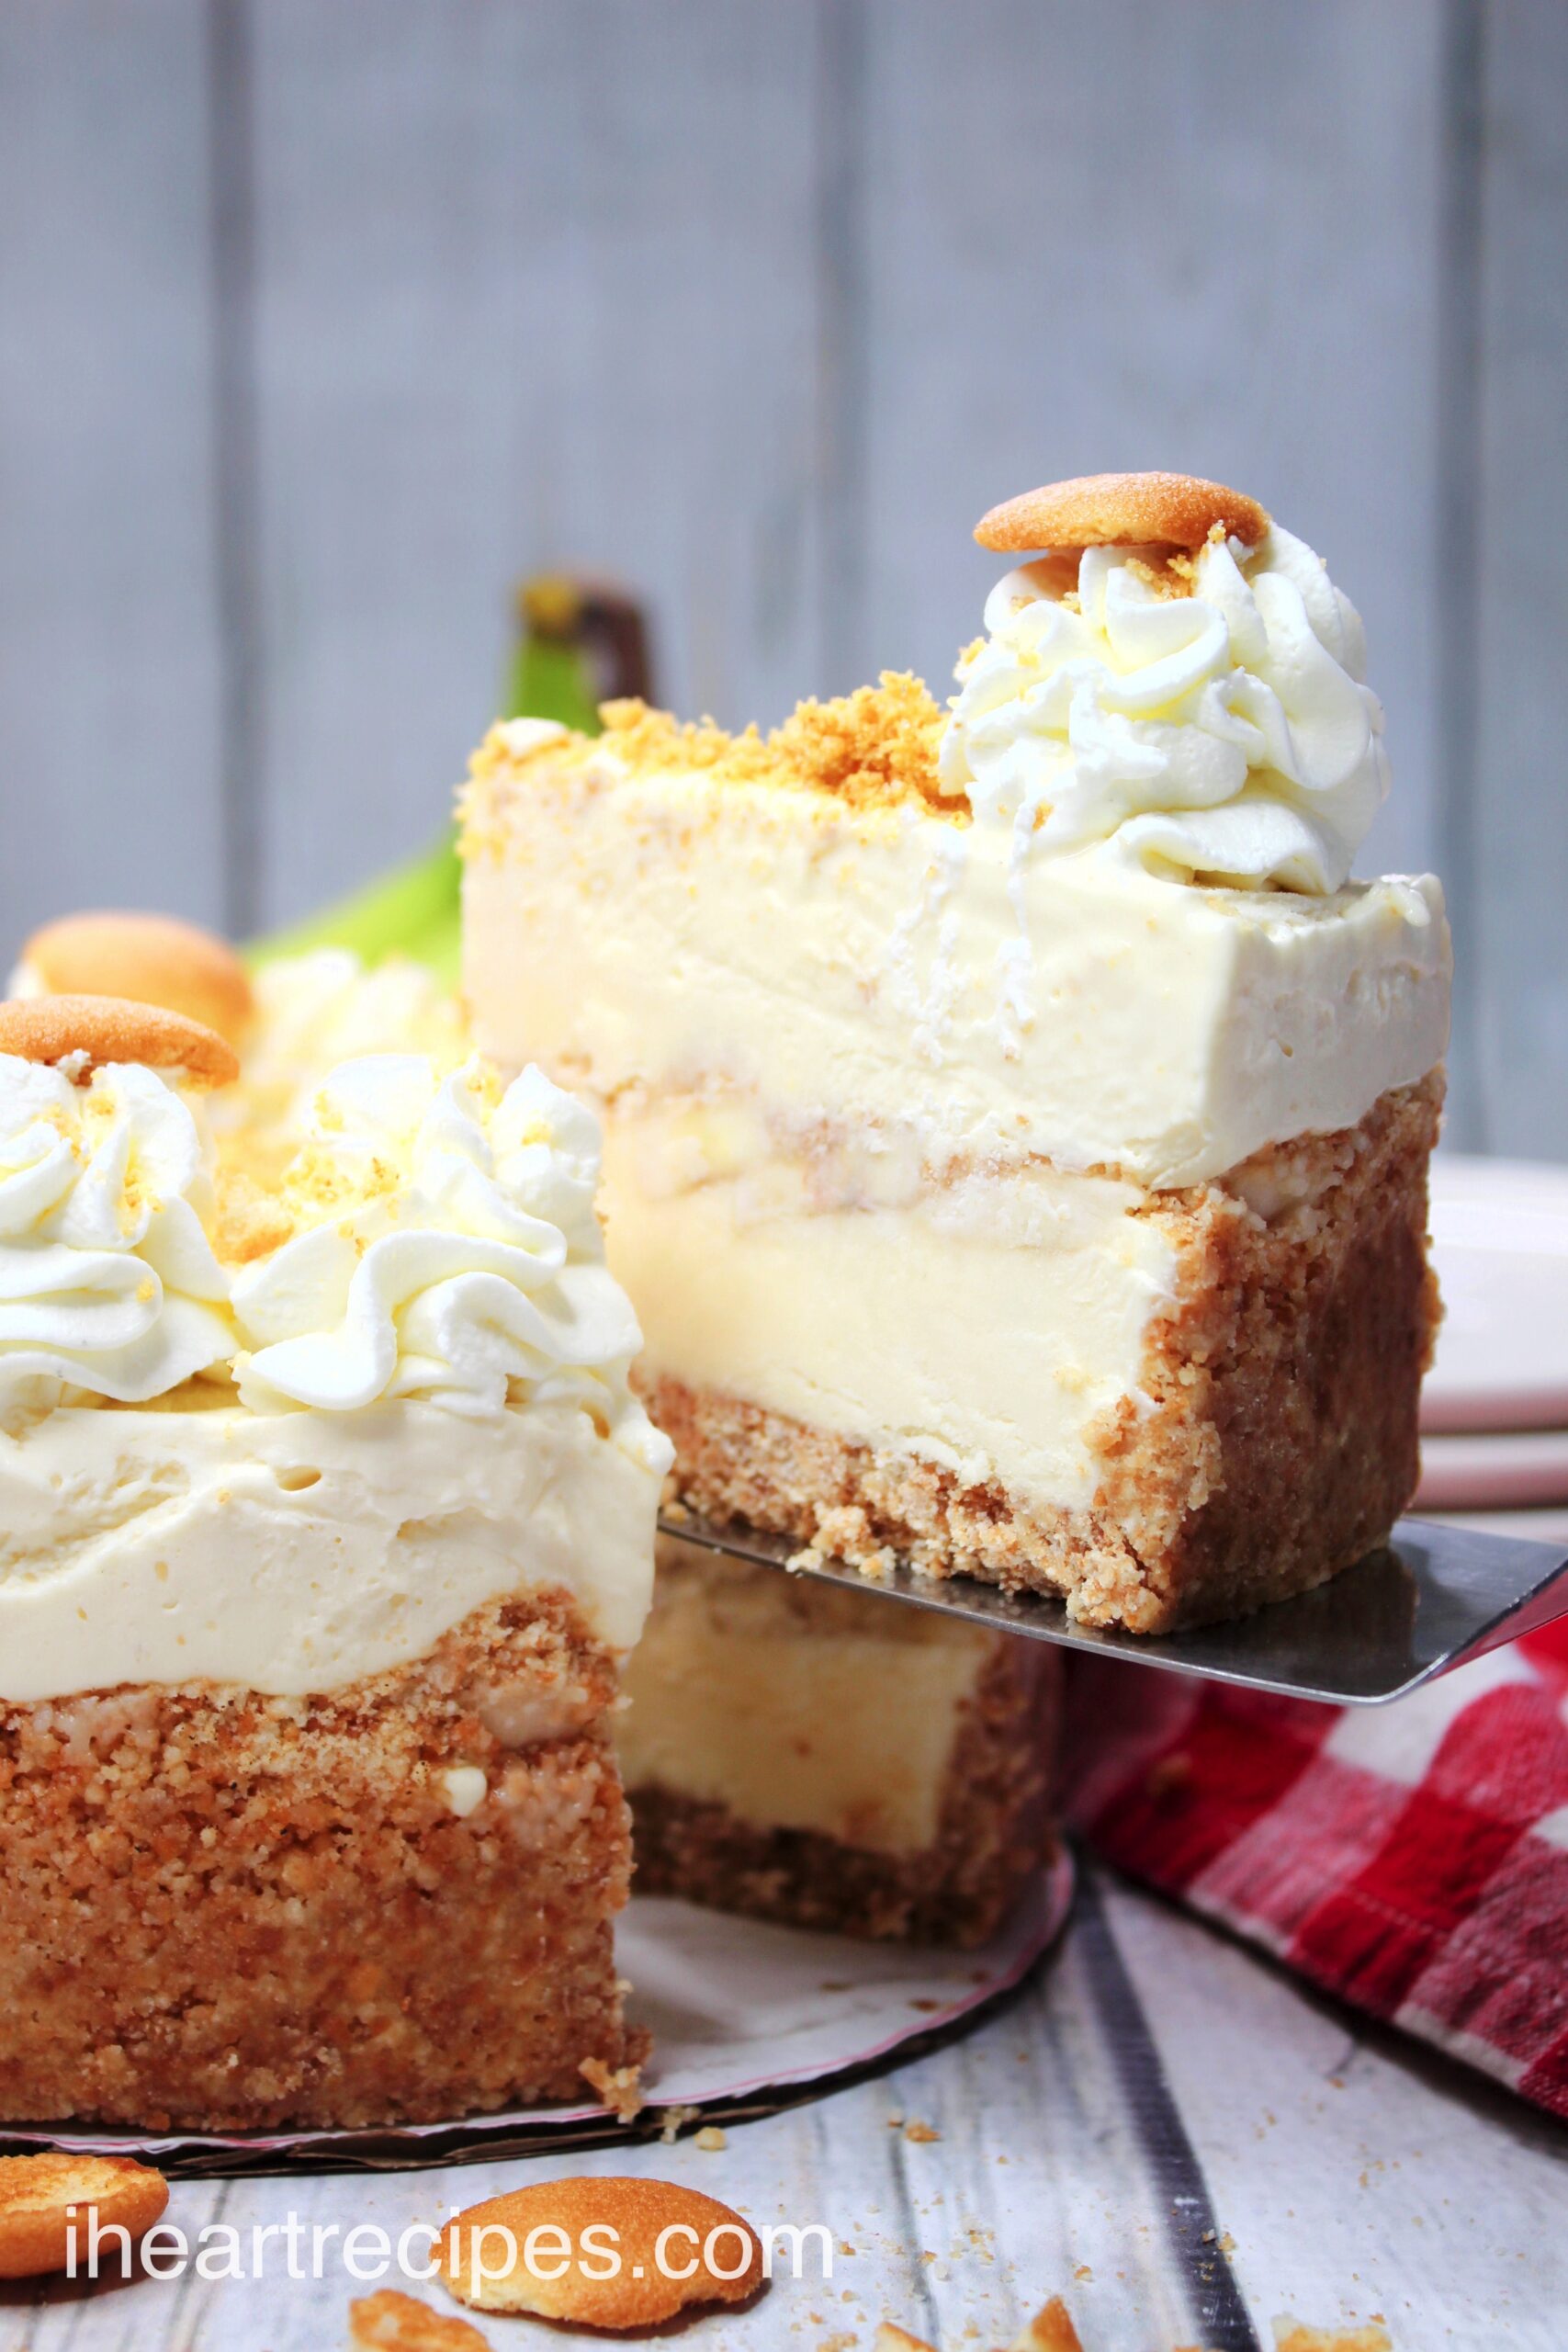
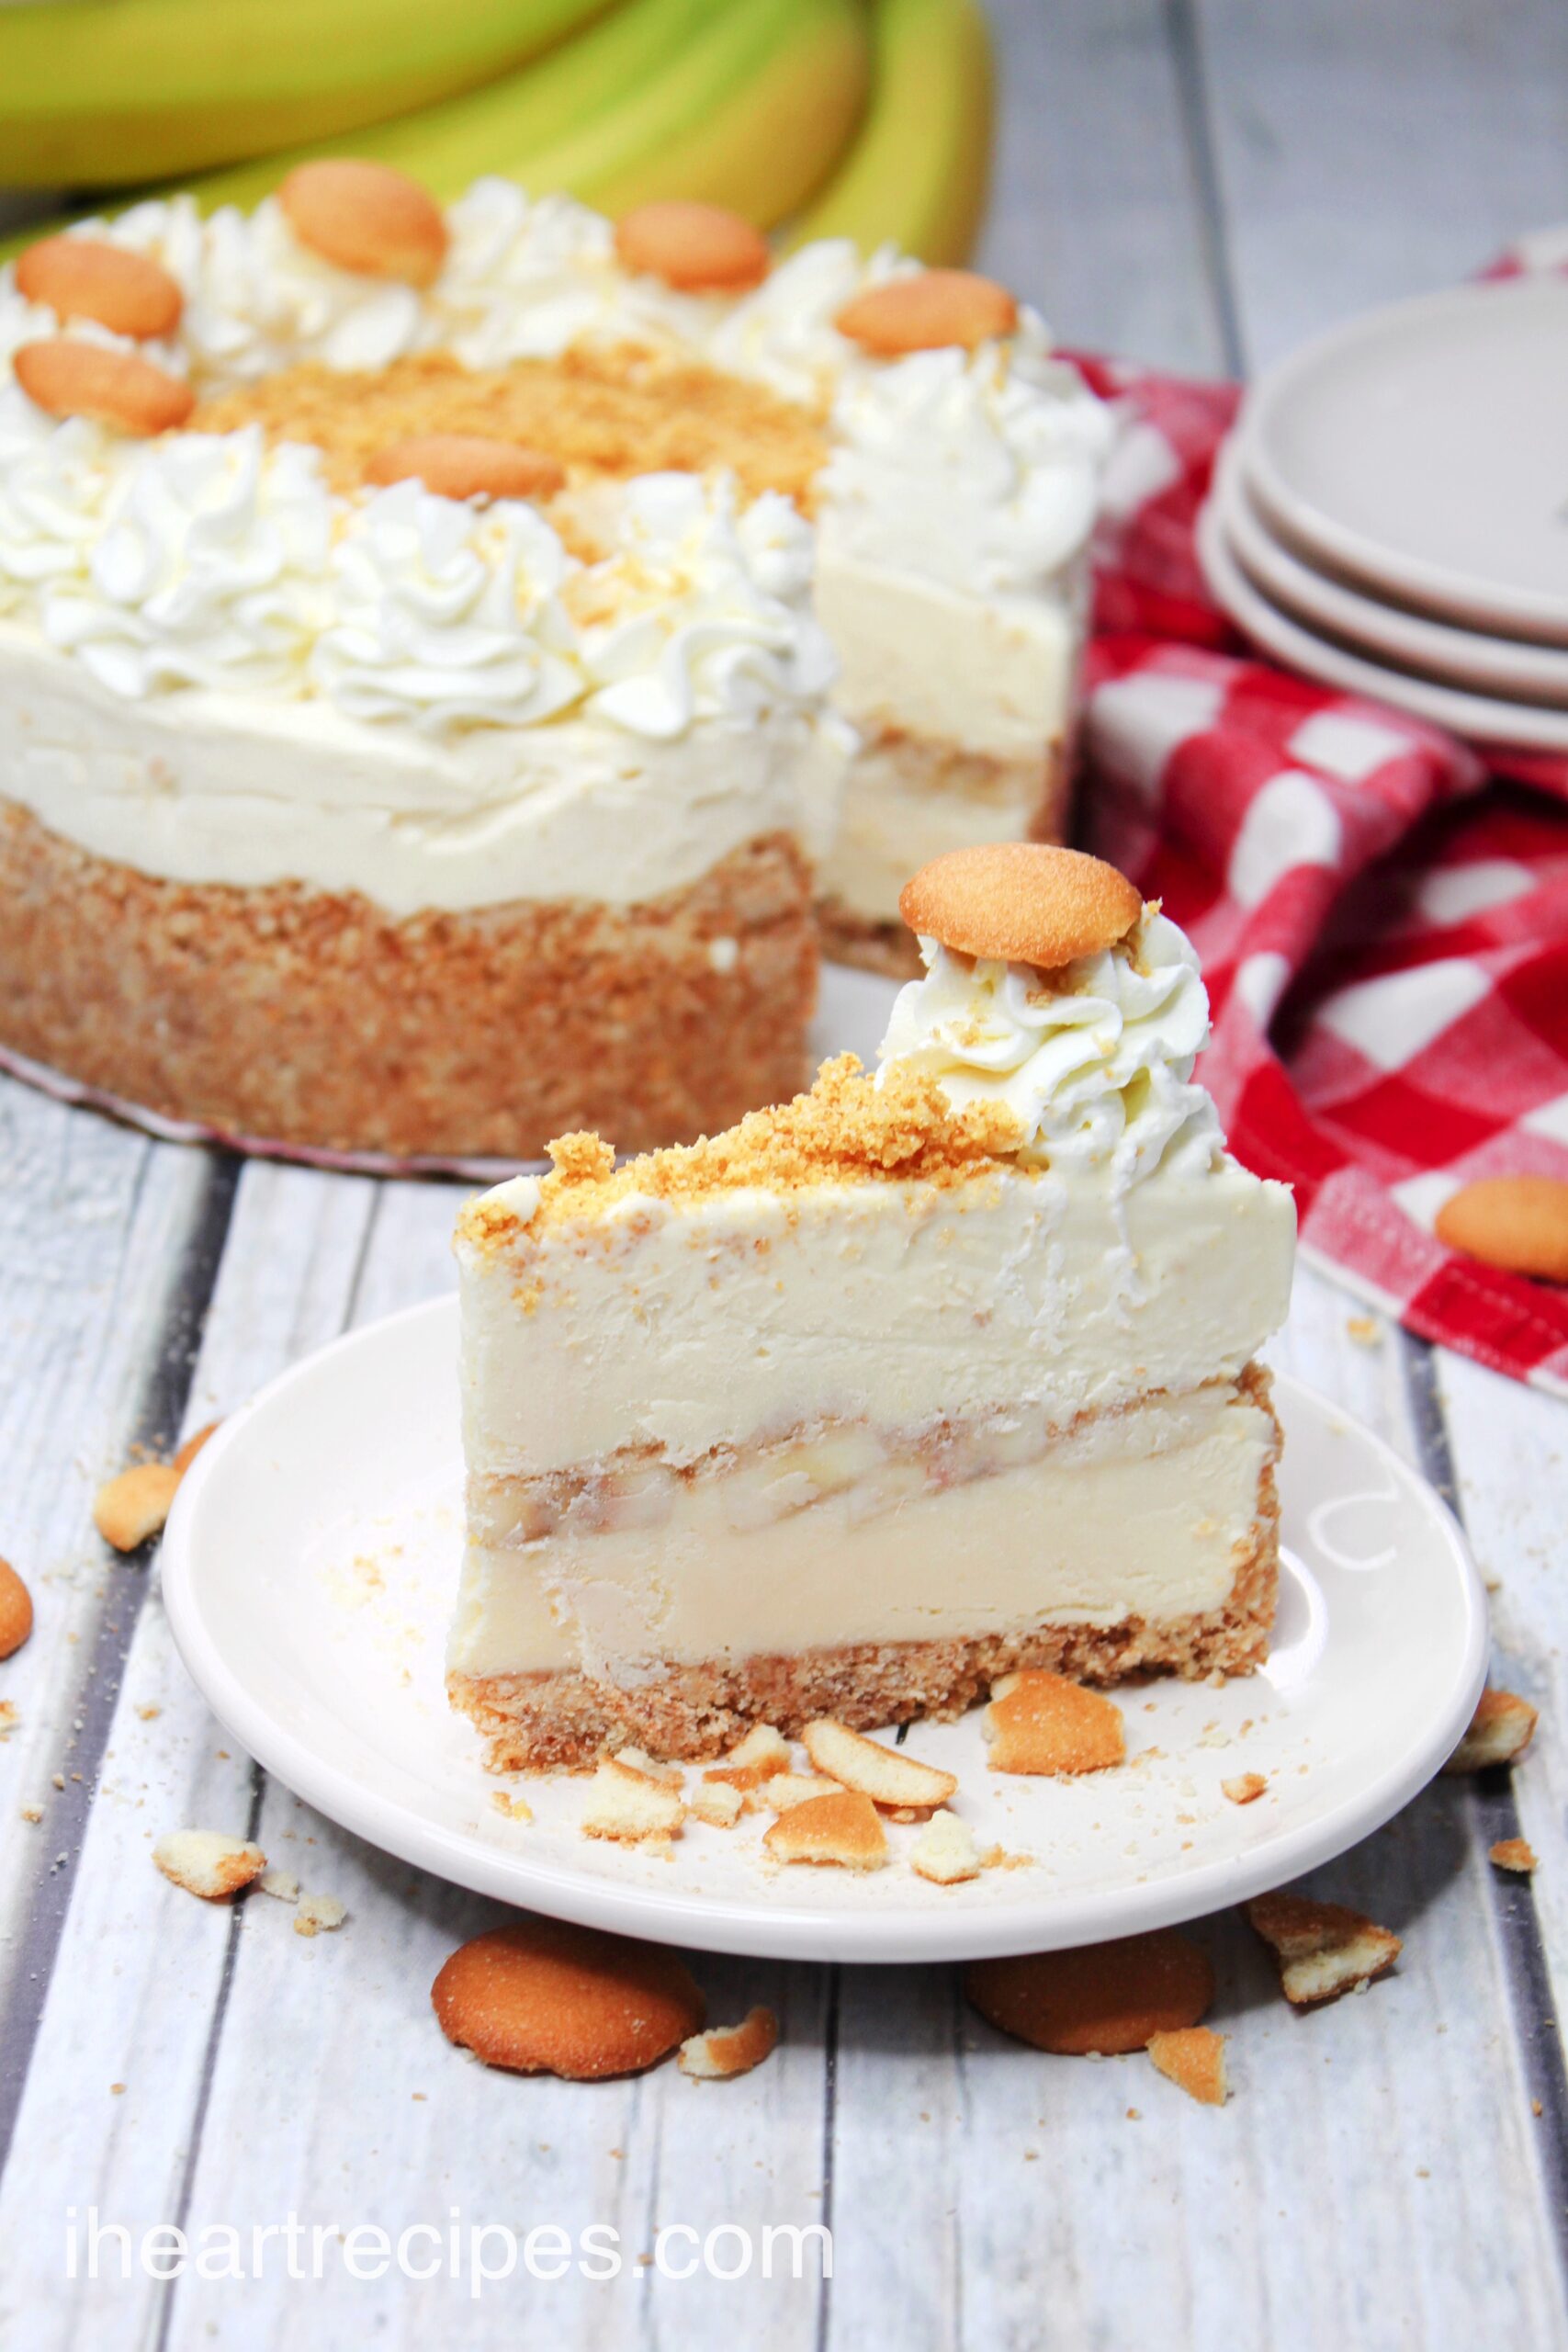
- Once set, remove the springform pan and place the cheesecake onto a serving plate
- When ready to serve, place the remaining 1 cup cold heavy cream and 2 tablespoons powdered sugar in the bowl of a stand mixer.
- Beat with the whisk attachment on medium-high speed until thick and fluffy, 2 to 3 minutes. Scoop the whipped cream into a piping bag.
- Pipe dollops all around the edge of the cheesecake.
- Sprinkle the rest of the cookie crumb in the center, and around the whipped cream.
- Place a mini Nilla wafer onto the top of the whipped cream.
- Place back into the fridge until ready to serve.
- Enjoy!


Leave a Comment